Link your students
Hand students your invite link or add them by email, then confirm each one.
A student and your institution are linked only when both of you agree: the student consents to share their progress with you, and you confirm that they are your student. Until then you see nothing about them. Any admin of your institution can link students, all from Students in the menu.
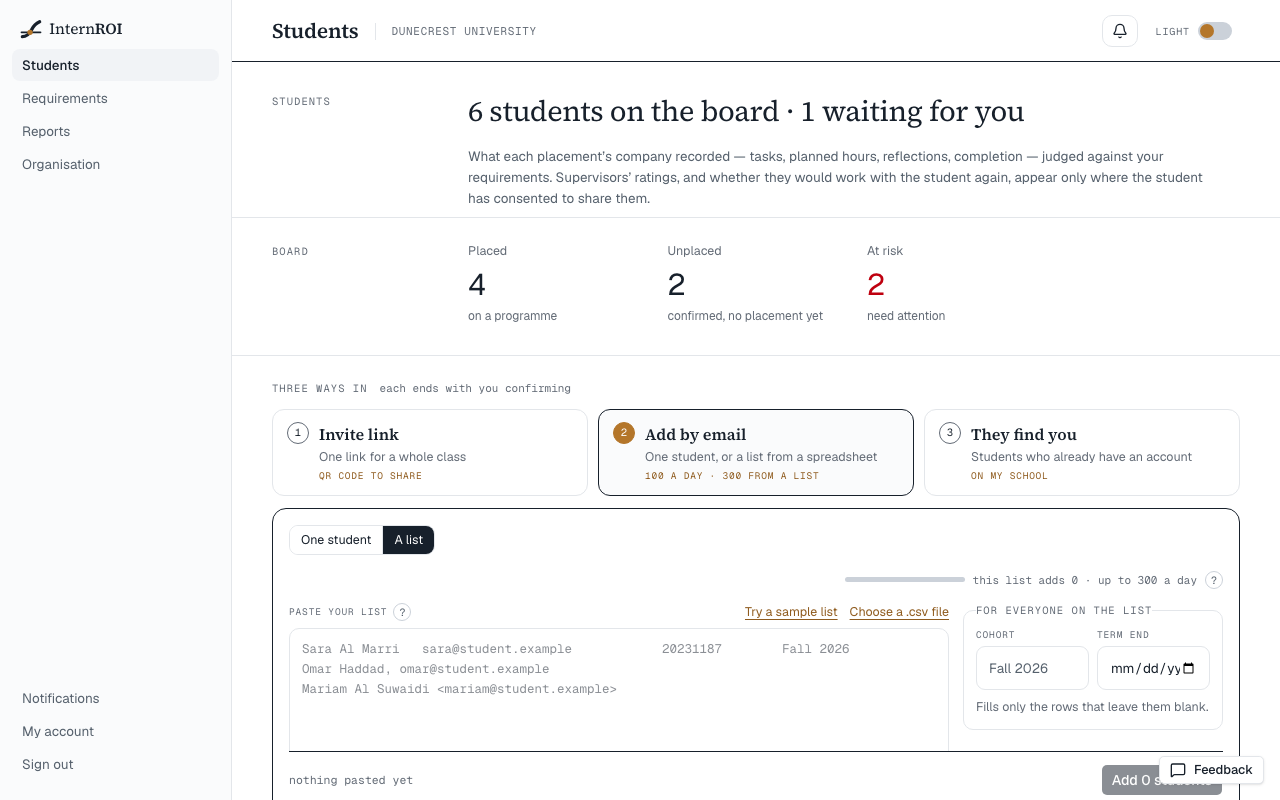
There are three ways a link starts, side by side under Three ways in: Invite link, Add by email and They find you (a student finding you on their My school screen). Each ends the same way — with you choosing Confirm.
Share your invite link
Under Three ways in, choose Invite link. It holds one link for all your students, and its QR code.
- Choose Copy link. It changes to Copied.
- Share it however suits you — by email, on a poster, in class. Students can also scan the QR code beside it.
- In a classroom, choose Show it in class: the whole screen goes dark with the QR code large, for students to scan from their seats. Press Esc or × to close it.
The link opens InternROI’s Create your intern account page, which says “You’re joining” your institution. After confirming their email address, on whichever device, the student lands on your institution’s consent screen. A student who is already signed in goes straight there. The link grants nothing by itself: you still confirm each student.
Add a student by email
Under Three ways in, choose Add by email, then One student.
- Fill in Full name and Email.
- Student number, Cohort and Term end are optional. The term end is the date by which you need the student placed and finished; it drives the early warning. Leave it blank if there is none.
- Choose Add student.
You will see Added. We have emailed … — they appear as confirmed once they accept and you confirm. The email, Your school added you on InternROI, tells the student how to create an account or sign in and open My school, where they accept.
Add a list of students
Under Add by email, choose A list — it is open first.
- Copy the rows from your spreadsheet and paste them into Paste your list, one student per line. Or choose Choose a .csv file — the file is read in your browser and never uploaded. Try a sample list shows how a list is read.
- A first line with the column names, such as Name and Email, is read as headings. Without one, the columns are read by what they hold. A line like “Sara Al Marri <sara@student.example>” is read as a name and an email. Dates are read day first: 30/06/2027.
- Check We read your columns as, and change any column that was read wrongly, or choose Leave out.
- For everyone on the list fills a Cohort and Term end only into rows that leave them blank.
- Check the table. Each row says Ready, or what to fix — Fix in the list selects that line for you — or that it is Twice in this list or already on your list. Choose × to leave a row out.
- Choose Add with the number of students ready. Nothing is sent before you do.
You see how far it has got, then one message: how many were added, and whether each email went. What was added leaves the list; what needs fixing stays. You can add up to 300 students a day from lists — past that, the rest wait in your list for tomorrow.
What the student does
On My school the student sees your institution and two switches: Share my progress with this school, which is required, and Share my supervisors’ ratings and whether they would work with me again, which is off unless they switch it on. They choose Confirm. A student you added can choose This isn’t my school instead. They need a date of birth on their profile first — and, if they are under 18, a parent or guardian. Their side, step by step: Your profile and school.
Confirm or remove a student
Links not yet confirmed are listed in the Waiting band, each with a status:
- Waiting for the student — you added them, and they have not accepted yet.
- Waiting for you to confirm — they have consented. The top of the page counts these, for example “3 students on the board · 1 waiting for you”.
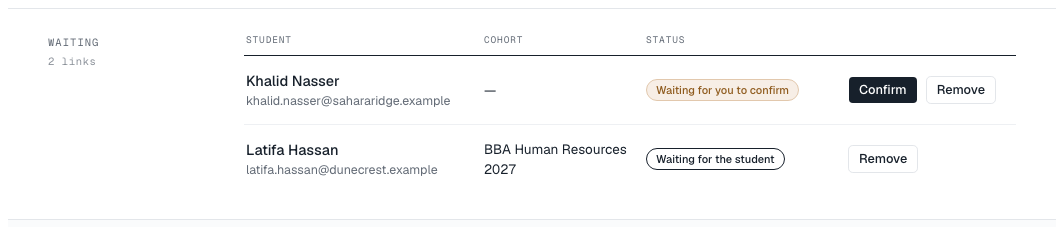
Choose Confirm on a row waiting for you. The student moves onto the board, under Placed or Unplaced — see Follow your students’ placements. Every admin of your institution is told when a student asks to link, or accepts your invitation — in Notifications and by email, at most once a day for the same student. The notice opens Students.
To turn a link down, choose Remove, then Remove followed by the student’s first name — or Keep to leave it. A removed address can be added again; the student is asked again from the start.
Messages you might see
- This student is already on your list — that address is already added or linked.
- Enter a valid email address or Enter the student’s name — check the form.
- That is enough new students for today. Try again in … — adding students by email has a daily limit. Your invite link is another way in meanwhile.
- Added, but the email to … could not be sent. Ask them to sign in and open My school; you can remove and add them again to retry.
- Could not copy — select the link above and copy it by hand. — your browser refused the copy.
- This school's account is suspended. — nothing new can be done until your account is reinstated. Contact support@internroi.com.